

Cut resistant gloves protect hands from lacerations caused by blades, glass, metal edges, and sharp materials. Choosing the right pair means understanding EN 388 and ANSI/ISEA 105 cut levels, materials, coatings, and task fit. This guide covers every factor, with cut resistant gloves from Shield Wings as the factory reference.
Last updated:
Quick definition: EN 388 rates cut resistance with two systems: the older coupe test scores cut resistance from 1 to 5, and the newer ISO 13997 test adds a letter from A to F that measures straight-blade cut resistance more accurately.
Key Takeaways
- ANSI/ISEA 105 uses a separate scale from A1 to A9 based on the same straight-blade (TDM) test, with A9 being the highest protection; the two systems measure the same physics with different labels.
- The main cut resistant materials are high-performance polyethylene (HPPE), steel mesh, fiberglass, and aramid fibers such as Kevlar, often knitted with a coating for grip — and each balances cut level, comfort,…
- Choose the coating by the task’s grip and wear demands: smooth nitrile for oily parts, foam nitrile for wet surfaces, polyurethane for precision work, and sand-coated or textured options for heavy handling.
- A cut resistant glove should fit snugly without restricting movement: no excess material at the fingertips, no tightness across the palm, and a cuff that stays in place — because fit directly affects both protection and…
- Choose by matching the cut level to the sharpness and force of the task, then weigh dexterity, grip, coating, and climate — and test the final choice on the actual job before bulk ordering.
- The table below gives a starting point for matching cut levels to common tasks.
What Do EN 388 Cut Levels Mean?
EN 388 rates cut resistance with two systems: the older coupe test scores cut resistance from 1 to 5, and the newer ISO 13997 test adds a letter from A to F that measures straight-blade cut resistance more accurately.
| EN 388 value | Meaning |
|---|---|
| 1–5 (coupe test) | Cut resistance under rotating blade, lower to higher |
| A–F (ISO 13997) | Straight-blade cut resistance, A lowest, F highest |
| Other digits | Abrasion (1–4), tear (1–4), puncture (1–4) |
For glass and sharp metal edges, the letter rating is the more reliable number, because the coupe test can be affected by blade dulling on abrasive materials. A glove rated 5B is not automatically better than one rated 4E — the letter reflects a different, often more relevant test. Always compare both numbers against the actual task.
The full EN 388 code also includes abrasion, tear, and puncture digits. A glove with excellent cut resistance but weak puncture performance is the wrong choice for handling wire ends, while an abrasion-heavy job such as moving rough concrete needs a high abrasion score first. Read the whole code, not just the cut number, and ask the supplier for the test report behind it. Labels summarize a longer story, and the story is where the real information lives.
How Do ANSI/ISEA 105 Cut Levels Compare?
ANSI/ISEA 105 uses a separate scale from A1 to A9 based on the same straight-blade (TDM) test, with A9 being the highest protection; the two systems measure the same physics with different labels.
The practical mapping is simple: A1–A3 for light handling, A4–A5 for moderate metal and glass work, A6–A7 for heavy fabrication, and A8–A9 for the highest blade exposures. Because EN ISO 13997 and ANSI use the same TDM test, levels correlate: roughly, EN A corresponds to ANSI A2–A3, up to EN F corresponding to ANSI A8–A9. Buyers exporting to multiple regions should ask suppliers for both ratings on the certificate so the same glove can be compared anywhere.
Cut ratings do not cover puncture, crush, thermal, chemical, or machine-entanglement risks; assess the full task and confirm with the manufacturer’s instructions and the applicable standard.
Which Materials Make a Cut Resistant Glove?
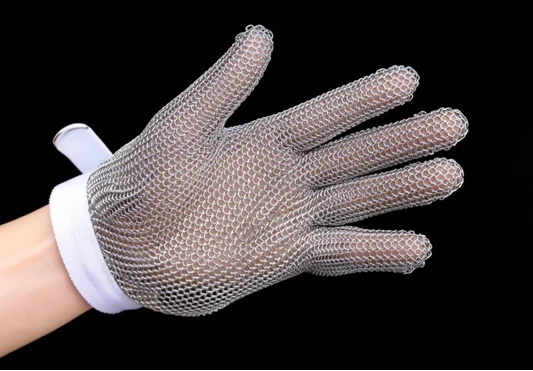
The main cut resistant materials are high-performance polyethylene (HPPE), steel mesh, fiberglass, and aramid fibers such as Kevlar, often knitted with a coating for grip — and each balances cut level, comfort, dexterity, and cost.
HPPE fibers such as Dyneema deliver high cut resistance with a lightweight feel, making them the most common choice for general industry. Aramid adds heat resistance, which suits welding and hot work. Steel mesh and stainless steel fiber gloves offer extreme cut resistance for meat cutting and glass handling, at the cost of comfort. Fiberglass blends raise cut levels at a low price but can irritate skin, so they are usually covered by a coating. The coating — nitrile, polyurethane, or latex — adds grip and wear resistance, and the right coating often matters as much as the fiber.
What Coating Should You Choose for Grip and Wear?
Choose the coating by the task’s grip and wear demands: smooth nitrile for oily parts, foam nitrile for wet surfaces, polyurethane for precision work, and sand-coated or textured options for heavy handling.
Nitrile coatings grip well on oily and dry parts and wear longer in fabrication. Foam nitrile adds a porous layer that channels water away, making it the standard for wet environments. Polyurethane is thin and flexible, preserving dexterity for assembly and inspection. Latex offers strong grip but can cause allergies and degrades with oils. When the job involves both cut hazards and slippery materials, the coating choice decides whether the glove is used or discarded.
How Should Cut Resistant Gloves Fit?
A cut resistant glove should fit snugly without restricting movement: no excess material at the fingertips, no tightness across the palm, and a cuff that stays in place — because fit directly affects both protection and dexterity.
Glove sizes follow the hand circumference around the palm, typically sizes 6 to 11. Workers should measure their dominant hand and try gloves at the end of the shift when hands are largest. A glove that is too large creates gaps that catch on edges and reduces grip control; one that is too small tires the hand and gets removed. For tasks mixing cut risk and fine work, a snug, coated glove preserves the dexterity that keeps workers from taking the glove off.
How Do You Choose the Right Glove for Your Task?
Choose by matching the cut level to the sharpness and force of the task, then weigh dexterity, grip, coating, and climate — and test the final choice on the actual job before bulk ordering.
Start with a task inventory: what material is handled, how sharp it is, and how much force is applied. Light assembly and packaging usually need ANSI A2–A4; sheet metal and glass handling need A4–A6; knife work and heavy fabrication need A6–A9. Then consider dexterity — the highest-rated glove is useless if workers cannot do fine work — and grip, because a dropped blade is a new hazard. Finally, run a wear trial: comfort and fit decide whether the glove gets worn.
Cut Resistant Glove Selection at a Glance
The table below gives a starting point for matching cut levels to common tasks. Always confirm with your own risk assessment and supplier test data.
| Task | Recommended cut level (ANSI/ISEA 105) | Typical construction |
|---|---|---|
| Light assembly, packaging | A2–A3 | HPPE, lightweight |
| Metal sheet and glass handling | A4–A6 | HPPE with nitrile coating |
| Heavy fabrication, sharp tooling | A6–A7 | HPPE/aramid, textured grip |
| Meat cutting, extreme blades | A8–A9 | Steel mesh or high-denier HPPE |
Where the hazard is severe, consider combining cut resistance with impact protection on the back of the hand — many factories need both for handling stamped parts and heavy components.
Selection should also consider how long gloves stay in service. A glove that lasts twice as long at 30 percent higher cost is often the cheaper option, especially when you factor in replacement labor and inventory. Track wear per task over a few months and let the data refine the spec. This is where a factory relationship pays off: we can adjust knit density, coating thickness, and cuff length to the specific wear patterns your operation reports.
Can You Get Custom or OEM Cut Resistant Gloves?
Yes. Shield Wings supplies cut resistant gloves through wholesale and OEM programs, including custom sizes, colors, branding, and coated grip patterns for specific industries.
Customization is more common than most buyers expect: food processors may need color-coded gloves for hygiene zones, manufacturers may want company branding or specific cuffs, and distributors often want private-label packaging. Because we are the factory, we can adjust the knit pattern, coating, and cuff, then approve a sample before production. Wholesale buyers can start with sample pairs, wear-test them, and scale. EN or ANSI test documentation for the delivered models is available on request to complete your compliance file.
Test documentation deserves a closer look during sourcing. The certificate should name the exact model, the standard edition, and the achieved levels — a generic “meets EN 388” statement is not enough. For distributors, keep the reports for every SKU in a folder that customers can request, because B2B buyers increasingly ask for proof before trial orders. Factories that track batch-level testing make this easy; intermediaries often cannot provide it, which is one more reason to buy from the source.
How Should Cut Resistant Gloves Be Maintained?
Follow the manufacturer’s washing guidance, inspect gloves before each use for cuts, holes, and fiber damage, and replace them when the coating wears or the knit is compromised — because a damaged glove protects far less than its rating suggests.
Most knit gloves are machine washable at low temperature without bleach; check the label, because some coatings are sensitive to heat and chemicals. Before every shift, stretch the glove and inspect the palm, fingers, and seams for damage. Cut resistance lives in the fibers, so a snag that breaks strands reduces the rating even if the hole looks small. Set a replacement schedule for high-use gloves and keep spares on hand so workers never have to choose between an unsafe glove and no glove.
Storage is an easy detail to get wrong. Keep gloves out of direct sunlight and away from ozone sources such as motors and welding equipment, which degrade fibers and coatings over time. Hang them to dry after washing rather than leaving them damp in a locker, and store clean gloves separately from oily rags and chemicals. When gloves come in standardized sizes and colors, assigning pairs to workers is simpler and prevents the hygiene and fit problems that come from sharing.
Expert Views
“The most common question buyers ask is ‘what is the highest cut level?’ — and the honest answer is that the highest level is rarely the right one. A9 gloves are hot, stiff, and expensive; putting them on an assembly line destroys dexterity and workers will take them off. The right approach is a task map: list every job, the sharpness and force involved, and the dexterity needed, then assign the lowest adequate level. The second factor people undervalue is the coating. The same knit with a nitrile palm grips wet metal far better and lasts three times longer in fabrication. My third piece of advice is to sample before scaling — wear the glove for a real shift, not a two-minute test. When level, grip, and fit all match the job, the glove gets worn, and that is when injuries actually drop.” — Hand Protection Specialist, Shield Wings
What Should Your Next Step Be?
Build a task map of your cutting hazards, assign each task a cut level, and request sample gloves before ordering your team’s full supply.
Send us your task list or current gloves, and our team will recommend the right cut levels, coatings, and sizes — with samples for wear testing and wholesale pricing confirmed in writing. Reach us through our contact page or explore the cut resistant gloves range to start. For facilities that also handle heavy impacts, ask about our hand protection options that combine both protections.
If you manage multiple sites, standardize the glove matrix across them while allowing local adjustments for climate and materials. A single spec sheet per task — cut level, coating, size range, and replacement cycle — makes purchasing consistent, training simpler, and audits straightforward. We can help build that matrix for your operation and supply every line in it.
Cut ratings do not cover puncture, crush, thermal, chemical, or machine-entanglement risks; assess the full task and confirm with the manufacturer’s instructions and the applicable standard.
Where Cut Injuries Actually Come From
Cut injuries cluster into a handful of patterns, and the pattern decides the control. A glove change is the right answer for one of them and the wrong answer for another — which is why an incident review that only asks “was a glove worn?” rarely changes anything.
| Pattern | Mechanism | Control that actually addresses it |
|---|---|---|
| Blade slips under load | Hand behind the blade line, no fixture | Fix the work, cut away from the body, add a jig |
| Dropped or falling blade | Handling between stations | Transport trays rather than hands, plus foot protection |
| Contact with a moving edge | Reaching past a machine guard | Guard the edge; a glove does not stop a powered blade |
| Glove caught and pulled in | Loose cuff or fabric near a rotating part | Snug fit, no entanglement, never wear gloves at rotating equipment |
| Glove removed mid-task | Heat, wet grip or loss of dexterity | Match the glove to the sub-task so it stays on |
| Wet or oily grip failure | Coating choice, not cut level | Re-select the coating; check the cut rating still fits the task |
Worked example: a five-question review after a cut
Illustrative template. After a laceration, the questions that change future selection are: what was the hand doing at the moment of contact; was the blade or edge under control of a fixture; which glove was being worn and was it still on the hand; what was on the tool or the material (oil, water, contamination); and what would have had to be different for the contact not to happen. Then run the answers back through the selection: if the pattern is a slip under load, the answer is a fixture and a technique, not a higher cut level; if the pattern is a glove that came off, the answer is a different glove for that sub-task.
Where a higher cut level stops helping
Cut resistance does not protect against a powered edge, and it does not replace guarding — the classic severe hand injuries happen where a guard was removed or defeated. It also does not address puncture: a needle or a wire needs a puncture-rated construction, and a high cut level tells you nothing about that. And the certificate covers the glove as tested, so a cut level quoted for a coating or a liner that differs from the one in the store is a number attached to the wrong article.
For the wider topic and related decisions, see our Hand, Cut & Impact Protection.
FAQs
Does a higher cut level mean a safer glove?
Not automatically. Match the level to the task; an over-rated glove reduces dexterity and may be discarded by workers, which creates a different risk.
Are cut resistant gloves also puncture resistant?
No. Cut and puncture are separate tests in both EN 388 and ANSI/ISEA 105. Needle and wire hazards require puncture-rated gloves.
Can the same glove be used for food processing?
Yes, when the materials and coatings are food-contact compliant. Color-coded options help maintain hygiene zones.
How do I verify the cut rating?
Request the EN 388 or ANSI/ISEA 105 test report from the supplier and check the level against your task map; labels should match the certificate.
Why do cut injuries still happen when gloves are worn?
Because most of them come from something a glove cannot fix: a blade slipping under load, an unguarded moving edge, or a glove that was taken off for a fiddly sub-task. A cut level reduces the consequence of contact; fixing the work, guarding the edge and matching the glove to the whole task are what remove the contact.
Do cut-resistant gloves protect against needles?
Not necessarily. Cut and puncture are separate properties tested by separate methods, so a glove at a high cut level can still be punctured by a needle or a wire. Where that hazard exists, specify a puncture-rated construction and check the puncture result on the report for the exact model.
Related Articles
- Custom FR Workwear: Branding Sizing and Fit for Teams
- 10 Common Arc Flash Safety Mistakes on Worksites
- Why Do Oil and Gas Workers Need FR Clothing?
- Hand Safety in Manufacturing: Injuries Prevention and PPE
- EN 388 Explained: Cut Resistance Testing for Gloves
- Cut Resistant Gloves: The Complete Buying Guide
Official Resources
- Cut Resistant Gloves
- Hand Safety In Manufacturing Injuries Prevention And Ppe
- Cut Resistance Levels En 388 Vs Ansi Isea 105 Explained
- High Temperature Gloves Types Ratings And Selection
- En 388 Explained Cut Resistance Testing For Gloves
- Cut Resistant Gloves For Food Processing What To Look For
- What Are Flame Resistant Coveralls And How Do They Protect You
- Contact Shield Wings